It is good practice when developing a web application to set up different environments for deploying changes. The number and nature of environments that are used can vary, but we’ll be using the following commonplace architecture:
- Development Environment: Where you develop the web application, typically on your local machine.
- Testing Environment: Where you perform tests to help ensure the quality of your application.
- Staging Environment: Where you deploy the application for the purpose of conducting “integration tests” that testing the broader functionality of your web app.
- Production Environment: Where you deploy your web app to your users.
In this Part 2 of our web app deployment and maintenance project, we’ll begin to set up some of these environments, including a database with an extremely simple schema as well as some additions to our application to incorporate the database and configure the app.
To follow along, you can clone the repository:
git clone https://github.com/marknagelberg/app-deploy.git
And then go to the appropriate location in the code changes with the following command:
git checkout 75521eb0e3d
Finally, create the python environment with:
conda env create -f environment.yml
Installing Additional Python Packages
To start off, we’ll install a couple of additional packages to our app’s Conda environment:
- Flask-SQLAlchemy: SQLAlchemy is a fantastic Python library that provides a way of interacting with your database purely in python, without having to write SQL query strings. Another benefit of using SQLAlchemy and similar ORMs is the ability to easily swap out databases if you decide you want to change in the future. Flask-SQLAlchemy is an extension for Flask that makes it easier to incorporate SQLAlchemy into Flask apps.
- Flask-Migrate: A Flask extension that provides a lightweight wrapper around the Alembic database migration framework. This will come in handy later when we need to make changes to our database schema after it’s already been deployed to production.
- Flask-WTF: A Flask extension that makes it easy to work with web forms.
- psycopg2: An adapter for PostgreSQL databases in Python. PostgreSQL will be our database of choice and this package is required to connect it up to our application.
To install these applications, first start up the Conda environment with the following command:
source activate app-deploy
Then install the packages above with the following commands:
pip install Flask-SQLAlchemy

pip install flask-migrate

pip install Flask-WTF

conda install psycopg2
Installing and Setting Up the PostgreSQL Databases
Next, we need to install PostgreSQL. You can find the proper install for your system here.
Postgres comes with a handy front end terminal program called psql, which allows you to examine your database’s tables and records using SQL queries. We first use psql to initialize two of the databases we’ll be working with for our program: the development database and the test database.
First enter into psql by typing psql into the terminal:
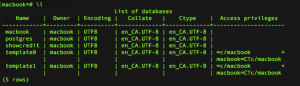
From here, you can run a bunch of useful commands. For example \l lists all the databases you currently have in postgres:
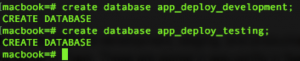
For now, we’ll need to use psql to create two databases that we’ll call app_deploy_development and app_deploy_test. This is as simple as running the two commands below.
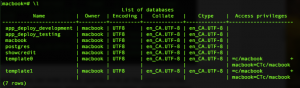
Running the command \l shows that these two databases have been created:
You can then exit postgres with the command \q or simply press control-d.
To be able to connect to this database from Flask / SQL Alchemy, we need the URL string associated with the database. In PostgreSQL, this takes the form:
postgresql://username:password@hostname:port/database
We’ll eventually be running the the development and test databases on localhost, so the hostname is ‘localhost’, the port is 5432 (this is a postgres default) and database is ’app_deploy_development’. You can confirm the port Postgres is running on by running the following command:

Configuring our Flask App
Now we’ll make some changes to the app so that the database is actually used.
FIrst we will begin to incorporate the application environments that we need. The main way to do this in Flask is through the configuration variables, which are stored in app.config variable (where app is the instance of your application).
The simplistic version of app.config is treated like a simple dictionary (e.g. you can set app.config[‘SECRET_KEY’] = ‘some_secret’), but this does not account for the fact that you need to work with different sets of configurations depending on how you’re running your application. Instead, a more flexible way to set up the app.config variable is to use a hierarchy of configuration classes, defined like this:
https://gist.github.com/marknagelberg/ccc001e4cf844bf9ddac6315029b339f
SQLALCHEMY_DATABASE_URI is an environmental variable required by SQLAlchemy to tell the extension where to find the database. Since these environmental variables are sensitive (they contain username and password information that you would not want to share), they are defined in your system’s environmental variables rather than including them in version control (you define these using the export command). Add the configuration code above is to a file called config.py in the app’s top directory.
Refactoring our App to use the Application Factory Pattern
We need to do some restructuring of our application to account for the database and implement the “application factory” pattern in Flask that allows us to provide different app instances with different configurations. We first move our app.py file into the /app folder. We also create an app/templates/ folder to store the front-end template that will hold the template for our front end form to enter names the and “hello world” message.
We also create /app/__init__.py:
https://gist.github.com/marknagelberg/e7d40c9b07c12db67033066e49392bec
This file stores our factory function ‘create_app’ that returns instances of the application. create_app takes a config_name argument, allowing us to create an app with the desired configuration option (e.g. create_app(‘development’), create_app(‘testing’), etc.) The configuration is assigned to the app within the factory function using the Flask app.config.from_object function along with the dictionary of configuration classes defined in config.py.
Adding the Database to our App
Rather than having just “Hello World”, we want to have our application make use of the database in some minimal way. So, we add a form where the user can enter names which are stored in the database inside a single table, consisting of a single column holding the names.
To define the database schema, we create a file called models.py:
https://gist.github.com/marknagelberg/8472a6e582dd07f14bae7d03bdd6b1ab
This file imports our database instance db. Here we define a ‘name’ string column, and an integer id that serves as a primary key (your table must have a primary key).
We also create a file create_app.py in the app’s top directory:
https://gist.github.com/marknagelberg/9bec1faf6673a94ed9ca1db163845ea7
This file is tasked with creating the instances of app from the create_app function defined in app/__init__.py. This function is what allows us to choose a particular configuration, which we define in an environment variable on our system called FLASK_CONFIG. It is also a place where we can do additional configuring of our newly generated application instance (e.g. creating commands for your app with the flask command line program by decorating functions with @app.cli.command()). This file may seem a little unnecessary now but it will come in handy later.
We also need to insert a form for the user to enter in data. We’ll use the assistance of the great Flask extension, Flask-WTF. With Flask-WTF, you define forms as classes that inherit from FlaskForm. Each of the class variables represents a field in the form that takes in certain types of values. Here our form is quite simple as it only takes a single field where the user can enter in names. There is also a ‘submit’ button which provides exactly what you expect.
https://gist.github.com/marknagelberg/eba3eb55421536c34a2649bfac05a213
Now that we have a form defined, we can define the new front end template index.html.
https://gist.github.com/marknagelberg/a00249c0c401bfe593a9500428beccaf
In our main application, we need to pass our NameForm class to render this template so we add the following code to app.py. Also note that, because of the way that we used the app_factory pattern, we must now use ‘BluePrints” for our view functions rather than defining routes in a single file directly to the app instance (blueprints are basically objects that can hold a bunch of an app’s routes and code and then can be registered with the application in the apps factory function).
https://gist.github.com/marknagelberg/a59dc1feb241dd02687be6b97d06fc1e
Running our Updated App With the Database
To run the application first define environmental variables:
- FLASK_APP, which tells the flask command line program where the flask application is located so that it can run it:
export FLASK_APP=create_app.py
- FLASK_CONFIG, which is the environmental variable that tells the program what environment your app should be running in. As a reminder, this value is used in create_app.py and references one of the values in the dict found in config.py.
export FLASK_CONFIG=development
- DEV_DATABASE_URL, which points to your development database. As a reminder, this is assigned to the environment variable SQLALCHEMY_DATABASE_URI in config.py.
export DEV_DATABASE_URL=”postgresql://<insert username>:<insert password>@localhost:5432/app_deploy_development”
Before you run the application the first time, you have to initialize the database. You only have to do this once, using the db.create_all() method provided by Flask-SQLAlchemy. From the top application directory run:
flask shell
>> from app import db
>> db.create_all()
Then you can exit the python interpreter with quit() or control-d.
Finally, run the application with:
flask run
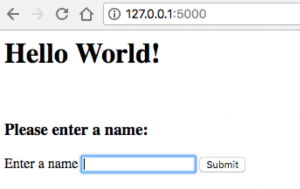
Now, when you visit http://127.0.0.1:5000/, you should see this:
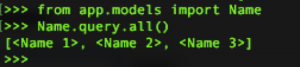
Your app should now be running with a live development database in the background ready to store whatever is entered into the form. To make sure it’s working, enter a few names into the form (for my test, I typed in “Foobar”, “Mark”, and “Joanna”). Then, in the terminal from the top directory in your app, write the command “flask shell” to run the python interpreter in the context of your app. This throws you into the python interpreter. We’ll then query the database to make sure our names exist:
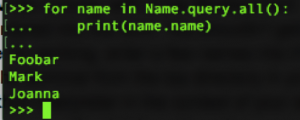
Looks like we’re good to go! Just to be sure, I loop through the names to make sure they’re the values we expect:
2 thoughts on “Deploying and Maintaining a Web App Part 2: Setting up the Database and App Configuration”