Lately I’ve been reading intensively on data engineering after being inspired by this great article by Robert Chang providing an introduction to the field. The underlying message of the article really resonated with me: when most people think of data science they immediately think about the stuff being done by very mature tech companies like Google or Twitter, like deploying uber-sophisticated machine learning models all the time.
However, many organizations are not at the stage where these kind of models makes sense as a top priority. This is because, to build and deploy these kind of models efficiently and effectively, you need to have foundation data infrastructure in place that you can build the models on. Yes, you can develop a machine learning model with the data you have in your organization, but you have to ask: how long did it take you to do it, is your work repeatable / automatable, and are you able to deploy or actually use your solution in a meaningful and reliable way? This is where data engineering comes in: it’s all about building the data warehouses and ETL pipelines (extract-transform-load) that provide the fundamental plumbing required to do everything else.
One tool that keeps coming up in my research on data engineering is Apache Airflow, which is “a platform to programmatically author, schedule and monitor workflows”. Essentially, Airflow is cron on steroids: it allows you to schedule tasks to run, run them in a particular order, and monitor / manage all of your tasks. It’s becoming very popular among data engineers / data scientists as a great tool for orchestrating ETL pipelines and monitor them as they run.
In this post, I’ll give a really brief overview of some key concepts in Airflow and then show a step-by-step deployment of Airflow in a Docker container.
Key Airflow Concepts
Before we get into deploying Airflow, there are a few basic concepts to introduce. See this page in the Airflow docs which go through these in greater detail and describe additional concepts as well.
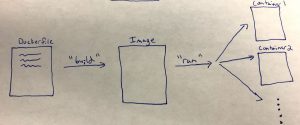
Directed Acyclic Graph (DAG): A DAG is a collection of the tasks you want to run, along with the relationships and dependencies between the tasks. DAGs can be expressed visually as a graph with nodes and edges, where the nodes represent tasks and the edges represent dependencies between tasks (i.e. the order in which the tasks must run). Essentially, DAGs represent the workflow that you want to orchestrate and monitor in Airflow. They are “acyclic”, which means that the graph has no cycles – in English, this means means your workflows must have a beginning and an end (if there was a cycle, the workflow would be stuck in an infinite loop).
Operators: Operators represent what is actually done in the tasks that compose a DAG workflow. Specifically, an operator represents a single task in a DAG. Airflow provides a lot of pre-defined classes with tons of flexibility about what you can run as tasks. This includes classes for very common tasks, like BashOperator, PythonOperator, EmailOperator, OracleOperator, etc. On top of the multitude of operator classes available, Airflow provides the ability to define your own operators. As a result, a task in your DAG can do almost anything you want, and you can schedule and monitor it using Airflow.
Tasks: A running instance of an operator. During the instantiation, you can define specific parameters associated with the operator and the parameterized task becomes a node in a DAG.
Deploying Airflow with Docker and Running your First DAG
This rest of this post focuses on deploying Airflow with docker and it assumes you are somewhat familiar with Docker or you have read my previous article on getting started with Docker.
As a first step, you obviously need to have Docker installed and have a Docker Hub account. Once you do that, go to Docker Hub and search “Airflow” in the list of repositories, which produces a bunch of results. We’ll be using the second one: puckel/docker-airflow which has over 1 million pulls and almost 100 stars. You can find the documentation for this repo here. You can find the github repo associated with this container here.
So, all you have to do to get this pre-made container running Apache Airflow is type:
docker pull puckel/docker-airflow
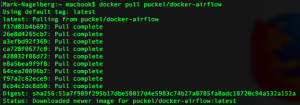
And after a few short moments, you have a Docker image installed for running Airflow in a Docker container. You can see your image was downloaded by typing:
docker images
![]()
Now that you have the image downloaded, you can create a running container with the following command:
docker run -d -p 8080:8080 puckel/docker-airflow webserver
Once you do that, Airflow is running on your machine, and you can visit the UI by visiting http://localhost:8080/admin/
On the command line, you can find the container name by running:
docker ps
You can jump into your running container’s command line using the command:
docker exec -ti <container name> bash
So in my case, my container was automatically named competent_vaughan by docker, so I ran the following to get into my container’s command line:
![]()
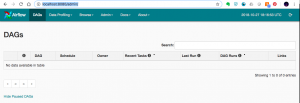
Running a DAG
So your container is up and running. Now, how do we start defining DAGs?
In Airflow, DAGs definition files are python scripts (“configuration as code” is one of the advantages of Airflow). You create a DAG by defining the script and simply adding it to a folder ‘dags’ within the $AIRFLOW_HOME directory. In our case, the directory we need to add DAGs to in the container is:
/usr/local/airflow/dags
The thing is, you don’t want to jump into your container and add the DAG definition files directly in there. One reason is that the minimal version of Linux installed in the container doesn’t even have a text editor. But a more important reason is that jumping in containers and editing them is considered bad practice and “hacky” in Docker, because you can no longer build the image your container runs on from your Dockerfile.
Instead, one solution is to use “volumes”, which allow you to share a directory between your local machine with the Docker container. Anything you add to your local container will be added to the directory you connect it with in Docker. In our case, we’ll create a volume that maps the directory on our local machine where we’ll hold DAG definitions, and the locations where Airflow reads them on the container with the following command:
docker run -d -p 8080:8080 -v /path/to/dags/on/your/local/machine/:/usr/local/airflow/dags puckel/docker-airflow webserver
The DAG we’ll add can be found in this repo created by Manasi Dalvi. The DAG is called Helloworld and you can find the DAG definition file here. (Also see this YouTube video where she provides an introduction to Airflow and shows this DAG in action.)
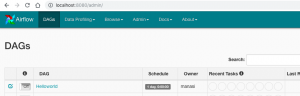
To add it to Airflow, copy Helloworld.py to /path/to/dags/on/your/local/machine. After waiting a couple of minutes, refreshed your Airflow GUI and voila, you should see the new DAG Helloworld:
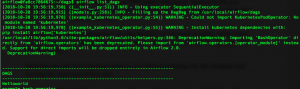
You can test individual tasks in your DAG by entering into the container and running the command airflow test. First, you enter into your container using the docker exec command described earlier. Once you’re in, you can see all of your dags by running airflow list_dags. Below you can see the result, and our Helloworld DAG is at the top of the list:
One useful command you can run on the command line before you run your full DAG is the airflow test command, which allows you to test individual tests as part of your DAG and logs the output to the command line. You specify a date / time and it simulates the run at that time. The command doesn’t bother with dependencies and doesn’t communicate state (running, success, failed, …) to the database, so you won’t see the results of the test in the Airflow GUI. So, with our Helloworld DAG, you could run a test on task_1
airflow test Helloworld task_1 2015-06-01
Note that when I do this, it appears to run without error; however, I’m not getting any logs output to the console. If anyone has any suggestions about why this may be the case, let me know.
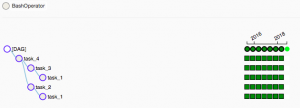
You can run the backfill command, specifying a start date and an end date to run the Helloworld DAG for those dates. In the example below, I run the dag 7 times, each day from June 1 – June 7, 2015:
![]()
When you run this, you can see the following in the Airflow GUI, which shows the success of the individual tasks and each of the runs of the DAG.
Resources
- I was confused about whether you can create DAGs with the UI, and this Stackoverflow Thread seems to indicate that you can’t. Note in the answer the responder mentions a few potentially useful tools for developing a UI where users can define DAGs without knowing Python.
- This Stackoverflow thread was helpful for figuring out that volumes are the solution to add DAGs to Airflow running in a container.
- Official tutorial from Apache Airflow
- Common Pitfalls Associated with Apache Airflow
- ETL Best Practices with Airflow