- {{[video]: https://www.youtube.com/watch?v=1rC4cTRZeWc}}
- Author:: [[Theo Browne]]
- Reading Status:: [[complete]]
- Review Status:: [[complete]]
- Tags:: #Video #programming #learning #[[Career]]
- Blog Notes URL:: https://www.marknagelberg.com/notes-on-3-things-i-wish-i-did-as-a-junior-dev-by-theo-browne/
- Roam Notes URL:: link
- Anki Tag:: theo_browne_3_junior_dev_tips
- Anki Deck Link:: link
-
Notes
- Overview: [[Theo Browne]] talks about the 3 main tactics he used when he was a new developer to level up extremely fast.
- Tip 1: Try to Get On Call
- Extremely valuable to see how things go wrong, and how they are fixed when they do.
- Tip 2: You Don’t Learn Codebases in the Code Tab on GitHub. You Learn Codebases on the Pull Request Tab on GitHub. #[[pull requests]] [[GitHub]]
- It helps you get critical [[context]] to see how code changes, how teams work in a codebase, what features are being developed, and why. This is what helps you build a mental map around the codebase to become a successful contributor.
- Tip 3: Interview More #[[interviews]]
- Do more interviews at other companies to see where you stand, but more importantly, do interviews yourself of prospective employees. You learn a lot about how good a developer you are, what expectations are, and what makes a good engineer. The more interviews you do on both sides, the more you understand the field overall.
Tag: programming
Roam Notes on “RailsConf 2017: How to Write Better Code Using Mutation Testing” by John Backus
- "Author::" [[John Backus]]
- "Source::" [[YouTube]]
- "Recommended By::" [[John Backus]]
- "Tags::" #programming #testing #Videos
- "Roam Notes URL::" https://www.marknagelberg.com/roam-notes-on-railsconf-2017-how-to-write-better-code-using-mutation-testing-by-john-backus/
- "Anki Tag::" backus_mutation_testing
- "Anki Deck Link::" link
- {{[video]: https://www.youtube.com/watch?v=uB7m9T7ymn8&feature=emb_title}}
- Overview
- [[John Backus]] gives an overview of [[mutation testing]] and why you should use it.
- Introduction #Ankified
- Line Coverage Formula = Lines of Code run by Test / Total Lines of code in the Project
- Mutation Coverage: How much of your code can I change without breaking your tests?
- If you can remove a line of code or meaningfully change the code without breaking a test, something is probably wrong: you’re missing a test or it’s dead code.
- Benefits of [[mutation testing]]:
- Learning about your programming language and the code you rely on
- Mutation testing frameworks have many special case mutations baked into the tool that you likely wouldn’t think of on your own. They teach you things about your language and the code you rely on, and you learn about them just-in-time.
- It makes you a better developer: "Mutation testing has been the most powerful source of growth for me in the past few years"
- You not only learn more about the code, but you learn faster. The feedback loop is fast, and you learn more per unit of time spent coding.
- Ship code with fewer bugs
- Introduce fewer regressions to code, since it lets you see hotspots where you could break the code without failing the test, resulting in a bug that you would only find in production. #Ankified
- It teaches you better testing skills – it forces you to think more about different conditions that can happen and the expected behaviour of your code.
- X-Raying Legacy Code #[[legacy]]
- Helps you find hot spots in legacy code, where you could potentially introduce a regression and the tests won’t fail. It gives you a checklist, and in each case you determine if you should change your tests or your code.
- Dead Code Detection
- Dead Code: code that is never executed, or when executed has no effect on the program. #Ankified
- Often shows you’re using redundant code, without consulting programming language’s documentation or coworkers.
- Better Test Coverage
- Learning about your programming language and the code you rely on
- Is it Practical? (30:15) #Ankified
- You might be wondering – I open PRs that are hundreds of lines long and my tests take hours to run. How is this practical?
- You can run mutation test only on code that has changed since a specified Git revision.
- You can specify a particular method you want to run the mutation tests on.
- Mutation Testing on the Job
- You should run mutation tests before you push code. You’ll learn more, write better code, and grow faster than your colleagues that refuse to use it.
- If you’re a team lead, incorporate mutation tests into [[continuous integration]]. You don’t need 100% mutation coverage to benefit.
For access to my shared Anki deck and Roam Research notes knowledge base as well as regular updates on tips and ideas about spaced repetition and improving your learning productivity, join “Download Mark’s Brain”.
Take your Python Skills to the Next Level With Fluent Python
You’ve been programming in Python for a while, and although you know your way around dicts, lists, tuples, sets, functions, and classes, you have a feeling your Python knowledge is not where it should be. You have heard about “pythonic” code and yours falls short. You’re an intermediate Python programmer. You want to move to advanced.
This intermediate zone is a common place for data scientists to sit. So many of us are self-taught programmers using our programming languages as a means to a data analysis end. As a result, we are less likely to take a deep dive into our programming language and we’re less exposed to the best practices of software engineering.
If this is where you are in your Python journey, then I highly recommend you take a look at the book “Fluent Python” by Luciano Ramalho. As an intermediate Python programmer, I’m the target audience for this book and it exceeded my expectations.
The book consists of 21 chapters divided into five broad sections:
- Data Structures: Covers the fundamental data structures within Python and their intricacies. This includes “sequences, mappings, and sets, as well as the str versus bytes split”. Some of this will be review for intermediate Python users, but it covers the topics in-depth and explains the counterintuitive twists of some of these data structures.
- Functions as Objects: Describes the implications of functions being “first class objects” in Python (which essentially means functions to be passed around as arguments and returned from functions). This influences how some design patterns are implemented (or not required to be implemented) in Python. First class functions are related to the powerful function decorator feature which is also covered in this section.
- Object-Oriented Idioms: A dive into various concepts related to object-oriented python programming, including object references, mutability, and recycling, using protocols and abstract base classes, inheritance, and operator overloading, among other topics.
- Control Flow: Covers a variety of control flow structures and concepts in Python, including iterables, context managers, coroutines, and concurrency.
- Metaprogramming: Metaprogramming in Python means creating or customizing classes at runtime. This section covers dynamic attributes and properties, descriptors, and class metaprogramming (including creating or modifying classes with functions, class decorators, and metaclasses).
There are a few things I really liked about this book:
- Advanced Target Market: There are lots of materials for Python beginners, but not nearly as many self-contained, organized resources that explain advanced material for intermediate users. This book helps fill that gap.
- Lots of great recommended resources: Each chapter has a “further reading” section with references to resources to expand your knowledge on the topic. The author not only links to these resources, but provides a brief summary and how they fit into the chapter’s material. Working through some of these references will be my game plan for the next several years as I work to propel my Python skills further.
- It’s opinionated and entertaining: The end of each chapter has a “soapbox” section providing an entertaining, informative, and opinionated aside about the subject. Reading this section feels like having a chat over a beer with a top expert of their field. It provides context and injects some passion into topics that can be dry. These opinionated sections are clearly quarantined from the rest of the book, so it never feels like the author’s personal tastes are pushed on you. I wish every programming book had a section like this.
- It pushes your understanding. I thought I was quite knowledgeable about Python and expected to work through this book quickly. I was wrong – it was slow reading and I plan on doing another deep read-through in 2020 to absorb more of the material.
So check it out. Also, check out an Anki deck I created that you can use as a complement to the book, which should help you to add insights that you want to commit to memory forever (here is a short guide on how to use my data science Anki decks).
Fluent Python Chapter Overview
Part 1: Prologue
- Chapter 1: The Python Data Model. Provides a background into the data model that makes Python such a great language to code, allowing experienced Python programmers to anticipate features in new packages / APIs before even looking at the documentation.
Part 2: Data Structures
- Chapter 2: An Array of Sequences. Sequences includes strings, bytes, lists, tuples, among other objects and are one of the most powerful concepts in Python. Python provides a common interface for iteration, slicing, sorting, and concatenating these objects and understanding the sequence types available and how to use them is key to writing Pythonic code.
- Chapter 3: Dictionaries and Sets. Dictionaries are not only widely used by Python programmers – they are widely used in the actual implementation code of the language. This chapter goes in-depth into the intricacies of dictionaries so you can make the best use of them.
- Chapter 4: Text versus Bytes. Python 3 made some big changes in its treatment of strings and bytes, getting rid of implicit conversion of bytes to Unicode. This chapter covers the details to understand Python 3 Unicode strings, binary sequences and encodings to convert from one to the other.
Part 3: Functions as Objects
- Chapter 5: First Class Functions. Python treats functions as first class objects, which means you can pass them around as objects. For example, you can pass a function as an argument to a function or return a function as the return value of another function. This chapter explores the implications of this power.
- Chapter 6: Design Patterns with First Class Functions. Many of the design patterns discussed in classic design patterns books change when you’re dealing with a dynamic programming language like Python. This chapter explores those patterns and how they look in Python’s first class function environment.
- Chapter 7: Function Decorators and Closures. Decorators are a powerful feature in Python that lets you augment the behaviour of functions.
Part 4: Object-Oriented Idioms
- Chapter 8: Object References, Mutability, and Recycling. This chapter covers details around references, object identity, value, aliasing, garbage collection, and the del command.
- Chapter 9: A Pythonic Object. A continuation of Chapter 1, providing hands-on examples of the power of the Python data model and giving you a taste of how to build a “Pythonic” object by building a class representing mathematical vectors.
- Chapter 10: Sequence Hacking, Hashing, and Slicing. An expansion of the Pythonic Vector object built in Chapter 9, adding support a variety of standard Python sequence operations, such as slicing.
- Chapter 11: Interfaces – From Protocols to ABCs. Building interfaces for a language like Python is typically different than C++ or Java. Specifically, Abstract Base Classes (ABCs) are less common in Python and the approach to interfaces is typically less strict, using “duck typing” and “protocols”. This chapter describes the various approaches to defining an interface in Python and food for thought about when to use each approach.
- Chapter 12: Inheritance – For Good or For Worse. Subclassing, with a focus on multiple inheritance, and the difficulties of subclassing the built-in types in Python.
- Chapter 13: Operator Overloading – Doing it Right. Operator overloading lets your objects work with Python operators such as |, +, &, -, ~, and more. This chapter covers some restrictions Python places on overloading these operators and shows how to properly overload the various types of operators available.
Part 5: Control Flow
- Chapter 14: Iterables, Iterators, and Generators. The iterator pattern from the classic design pattern texts is built into Python, so you never have to implement it yourself. This chapter studies iterables and related constructs in Python.
- Chapter 15: Context Managers, and else Blocks. The bulk of this chapter covers the with statement (and related concepts), which is a powerful tool for automatically building up a temporary context and tearing it down after you’re done with it (e.g. opening / closing a file or database).
- Chapter 16: Coroutines. This chapter describes coroutines, how they evolved from generators, and how to work with them, including an example of using coroutines for discrete event simulation (simulating a taxi fleet).
- Chapter 17: Concurrency with Futures. This chapter teaches the concept of futures as “objects representing the asynchronous execution of an operation”. It also focuses on the concurrent.futures library, for which futures are foundational concept.
- Chapter 18: Concurrency with asyncio. A dive into the asyncio package that implements concurrency and is part of the standard library.
Part 6: Metaprogramming
- Chapter 19: Dynamic Attributes and Properties. In programming languages like Java, it’s considered bad practice to let clients directly access a class public attributes. In Python, this is actually a good idea thanks to properties and dynamic attributes that can control attribute access.
- Chapter 20: Attribute Descriptors. Descriptors are like properties since they let you define access logic for attributes; however, descriptors let you generalize and reuse the access logic across multiple attributes.
- Chapter 21: Class Metaprogramming. Metaprogramming in Python means creating or customizing classes at runtime. Python allows you to do this by creating classes with functions, inspecting or changing classes with class decorators, and using metaclasses to create whole new categories of classes.
You can access an Anki flashcard deck I created to accompany Fluent Python here.
Getting Started with Airflow Using Docker
Lately I’ve been reading intensively on data engineering after being inspired by this great article by Robert Chang providing an introduction to the field. The underlying message of the article really resonated with me: when most people think of data science they immediately think about the stuff being done by very mature tech companies like Google or Twitter, like deploying uber-sophisticated machine learning models all the time.
However, many organizations are not at the stage where these kind of models makes sense as a top priority. This is because, to build and deploy these kind of models efficiently and effectively, you need to have foundation data infrastructure in place that you can build the models on. Yes, you can develop a machine learning model with the data you have in your organization, but you have to ask: how long did it take you to do it, is your work repeatable / automatable, and are you able to deploy or actually use your solution in a meaningful and reliable way? This is where data engineering comes in: it’s all about building the data warehouses and ETL pipelines (extract-transform-load) that provide the fundamental plumbing required to do everything else.
One tool that keeps coming up in my research on data engineering is Apache Airflow, which is “a platform to programmatically author, schedule and monitor workflows”. Essentially, Airflow is cron on steroids: it allows you to schedule tasks to run, run them in a particular order, and monitor / manage all of your tasks. It’s becoming very popular among data engineers / data scientists as a great tool for orchestrating ETL pipelines and monitor them as they run.
In this post, I’ll give a really brief overview of some key concepts in Airflow and then show a step-by-step deployment of Airflow in a Docker container.
Key Airflow Concepts
Before we get into deploying Airflow, there are a few basic concepts to introduce. See this page in the Airflow docs which go through these in greater detail and describe additional concepts as well.
Directed Acyclic Graph (DAG): A DAG is a collection of the tasks you want to run, along with the relationships and dependencies between the tasks. DAGs can be expressed visually as a graph with nodes and edges, where the nodes represent tasks and the edges represent dependencies between tasks (i.e. the order in which the tasks must run). Essentially, DAGs represent the workflow that you want to orchestrate and monitor in Airflow. They are “acyclic”, which means that the graph has no cycles – in English, this means means your workflows must have a beginning and an end (if there was a cycle, the workflow would be stuck in an infinite loop).
Operators: Operators represent what is actually done in the tasks that compose a DAG workflow. Specifically, an operator represents a single task in a DAG. Airflow provides a lot of pre-defined classes with tons of flexibility about what you can run as tasks. This includes classes for very common tasks, like BashOperator, PythonOperator, EmailOperator, OracleOperator, etc. On top of the multitude of operator classes available, Airflow provides the ability to define your own operators. As a result, a task in your DAG can do almost anything you want, and you can schedule and monitor it using Airflow.
Tasks: A running instance of an operator. During the instantiation, you can define specific parameters associated with the operator and the parameterized task becomes a node in a DAG.
Deploying Airflow with Docker and Running your First DAG
This rest of this post focuses on deploying Airflow with docker and it assumes you are somewhat familiar with Docker or you have read my previous article on getting started with Docker.
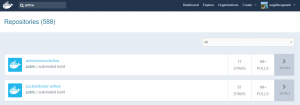
As a first step, you obviously need to have Docker installed and have a Docker Hub account. Once you do that, go to Docker Hub and search “Airflow” in the list of repositories, which produces a bunch of results. We’ll be using the second one: puckel/docker-airflow which has over 1 million pulls and almost 100 stars. You can find the documentation for this repo here. You can find the github repo associated with this container here.
So, all you have to do to get this pre-made container running Apache Airflow is type:
docker pull puckel/docker-airflow
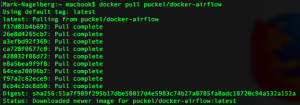
And after a few short moments, you have a Docker image installed for running Airflow in a Docker container. You can see your image was downloaded by typing:
docker images
![]()
Now that you have the image downloaded, you can create a running container with the following command:
docker run -d -p 8080:8080 puckel/docker-airflow webserver
Once you do that, Airflow is running on your machine, and you can visit the UI by visiting http://localhost:8080/admin/
On the command line, you can find the container name by running:
docker ps
You can jump into your running container’s command line using the command:
docker exec -ti <container name> bash
So in my case, my container was automatically named competent_vaughan by docker, so I ran the following to get into my container’s command line:
![]()
Running a DAG
So your container is up and running. Now, how do we start defining DAGs?
In Airflow, DAGs definition files are python scripts (“configuration as code” is one of the advantages of Airflow). You create a DAG by defining the script and simply adding it to a folder ‘dags’ within the $AIRFLOW_HOME directory. In our case, the directory we need to add DAGs to in the container is:
/usr/local/airflow/dags
The thing is, you don’t want to jump into your container and add the DAG definition files directly in there. One reason is that the minimal version of Linux installed in the container doesn’t even have a text editor. But a more important reason is that jumping in containers and editing them is considered bad practice and “hacky” in Docker, because you can no longer build the image your container runs on from your Dockerfile.
Instead, one solution is to use “volumes”, which allow you to share a directory between your local machine with the Docker container. Anything you add to your local container will be added to the directory you connect it with in Docker. In our case, we’ll create a volume that maps the directory on our local machine where we’ll hold DAG definitions, and the locations where Airflow reads them on the container with the following command:
docker run -d -p 8080:8080 -v /path/to/dags/on/your/local/machine/:/usr/local/airflow/dags puckel/docker-airflow webserver
The DAG we’ll add can be found in this repo created by Manasi Dalvi. The DAG is called Helloworld and you can find the DAG definition file here. (Also see this YouTube video where she provides an introduction to Airflow and shows this DAG in action.)
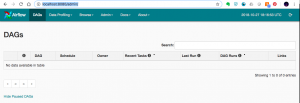
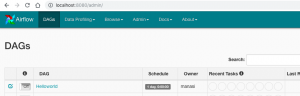
To add it to Airflow, copy Helloworld.py to /path/to/dags/on/your/local/machine. After waiting a couple of minutes, refreshed your Airflow GUI and voila, you should see the new DAG Helloworld:
You can test individual tasks in your DAG by entering into the container and running the command airflow test. First, you enter into your container using the docker exec command described earlier. Once you’re in, you can see all of your dags by running airflow list_dags. Below you can see the result, and our Helloworld DAG is at the top of the list:
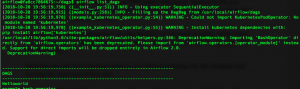
One useful command you can run on the command line before you run your full DAG is the airflow test command, which allows you to test individual tests as part of your DAG and logs the output to the command line. You specify a date / time and it simulates the run at that time. The command doesn’t bother with dependencies and doesn’t communicate state (running, success, failed, …) to the database, so you won’t see the results of the test in the Airflow GUI. So, with our Helloworld DAG, you could run a test on task_1
airflow test Helloworld task_1 2015-06-01
Note that when I do this, it appears to run without error; however, I’m not getting any logs output to the console. If anyone has any suggestions about why this may be the case, let me know.
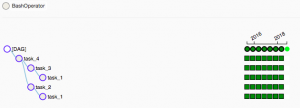
You can run the backfill command, specifying a start date and an end date to run the Helloworld DAG for those dates. In the example below, I run the dag 7 times, each day from June 1 – June 7, 2015:
![]()
When you run this, you can see the following in the Airflow GUI, which shows the success of the individual tasks and each of the runs of the DAG.
Resources
- I was confused about whether you can create DAGs with the UI, and this Stackoverflow Thread seems to indicate that you can’t. Note in the answer the responder mentions a few potentially useful tools for developing a UI where users can define DAGs without knowing Python.
- This Stackoverflow thread was helpful for figuring out that volumes are the solution to add DAGs to Airflow running in a container.
- Official tutorial from Apache Airflow
- Common Pitfalls Associated with Apache Airflow
- ETL Best Practices with Airflow
Digging into Data Science Tools: Docker
Docker is a tool for creating and managing “containers” which are like little virtual machines where you can run your code. A Docker container is like a little Linux OS, preinstalled with everything you need to run your web app, machine learning model, script, or any other code you write.
Docker containers are like a really lightweight version of virtual machines. They use way less computer resources than a virtual machine, and can spin up in seconds rather than minutes. (The reason for this performance improvement is Docker containers share the kernel of the host machine, whereas virtual machines run a separate OS with a separate kernel for every virtual machine.)
Aly Sivji provides a great comparison of Docker containers to shipping containers. Shipping containers improved efficiency of logistics by standardizing the design: they all operate the same way and we have standardized infrastructure for dealing with them, and as a result you can ship them regardless of transportation type (truck, train, or boat) and logistics company (all are aware of shipping containers and mold to their standards). In a similar way, Docker provides a standardized software container which you can pass into different environments and be confident they’ll run as you expect.
Brief Overview of How Docker Works
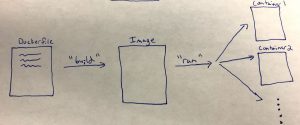
To give you a really high-level overview of how Docker works, first let’s define three big Docker-related terms – “Dockerfile”, “Image”, and “Container”:
- Dockerfile: A text file you write to build the Docker “image” that you need (see definition of image below). You can think of the Dockerfile like a wrapper around the Linux command line: the commands that you would use to set up a Linux system on the command line have equivalents which you can place in a docker file. “Building” the Dockerfile produces an image that represents a Linux machine that’s in the exact state that you need. You can learn all about the ins-and-outs of the syntax and commands at the Dockerfile reference page. To get an idea of what Dockerfiles look like, here is a Dockerfile you would use to create an image that has the Ubuntu 15.04 Linux distribution, copy all the files from your application to ./app in the image, run the make command on /app within your image’s Linux command line, and then finally run the python file defined in /app/app.py:
FROM ubuntu:15.04
COPY . /app
RUN make /app
CMD python /app/app.py
- Image: A “snapshot” of the environment that you want the containers to run. The images include all you need to run your code, such as code dependencies (e.g. python venv or conda environment) and system dependencies (e.g. server, database). You “build” images from Dockerfiles which define everything the image should include. You then use these images to create containers.
- Container: An “instance” of the image, similar to how objects are instances of classes in object oriented programming. You create (or “run” using Docker language) containers from images. You can think of containers as a running the “virtual machine” defined by your image.
To sum up these three main concepts: you write a Dockerfile to “build” the image that you need, which represents the snapshot of your system at a point in time. From this image, you can then “run” one or more containers with that image.
Here are a few other useful terms to know:
- Volume: “Shared folders” that lets a docker container see the folder on your host machine (very useful for development, so your container is automatically updated with your code changes). Volumes also allow one docker container to see data in another container. Volumes can be “persistent” (the volume continues to exist after the container is stopped) or “ephemeral” (the volume disappears as soon as the container is stopped).
- Container Orchestration: When you first start using Docker, you’ll probably just spin up one container at a time. However, you’ll soon find that you want to have multiple containers, each running using a different image with different configurations. For example, a common use of Docker is deployment of applications as “microservices”, where each Docker container represents an individual microservice that interacts with your other microservices to deliver your application. Since it can get very unwieldy to manage multiple containers manually, there are “container orchestration” tools that automate tasks such as starting up all your containers, automatically restarting failing containers, connecting containers together so they can see each other, and distributing containers across multiple computers. Examples of tools in this space include docker-compose and Kubernetes.
- Docker Daemon / Docker Client: The Docker Daemon must be running on the machine where you want to run containers (could be on your local or remote machine). The Docker Client is front-end command line interface to interact with Docker, connect to the Docker Daemon, and tell it what to do. It’s through the Docker client where you run commands to build images from Dockerfiles, create containers from images, and do other Docker-related tasks.
Why is Docker useful to Data Scientists?
You might be thinking “Oh god, another tool for me to learn on top of the millions of other things I have to keep on top of? Is it worth my time to learn it? Will this technology even exist in a couple years?”
I think the answer is, yes, this is definitely a worthwhile tool for you to add to your data science toolbox.
To help illustrate, here is a list of reasons for using Docker as a data scientist, many of which are discussed in Michael D’agostino’s “Docker for Data Scientists” talk as well as this Lynda course from Arthur Ulfeldt:
- Creating 100% Reproducible Data Analysis: Reproducibility is increasingly recognized as critical for both methodological and legal reasons. When you’re doing analysis, you want others to be able to verify your work. Jupyter notebooks and Python virtual environments are a big help, but you’re out of luck if you have critical system dependencies. Docker ensures you’re running your code in exactly the same way every time, with the same OS and system libraries.
- Documentation: As mentioned above, the basis for building docker containers is a “Dockerfile”, which is a line by line description of all the stuff that needs to exist in your image / container. Reading this file gives you (and anyone else that needs to deploy your code) a great understanding about what exactly is running on the container.
- Isolation: Using Docker helps ensure that your tools don’t conflict with one another. By running them in separate containers, you’ll know that you can run Python 2, Python 3, and R and these pieces of software will not interfere with each other.
- Gain DevOps powers: in the words of Michaelangelo D’Agostino, “Docker Democratizes DevOps”, since it opens up opportunities to people that used to only available to systems / DevOps experts:
- Docker allows you to more easily “sidestep” DevOps / system administration if you aren’t interested, since someone can create a container for you and all you have to do it run it. Similarly, if you like working with Docker, you can create a container less technically savvy coworkers that lets them run things easily in the environment they need.
- Docker provides the ability to build docker containers starting from existing containers. You can find many of these on DockerHub, which holds thousands of pre-built Dockerfiles and images. So if you’re running a well-known application (or even obscure applications), there is often a Dockerfile already available that can give you a tremendous running start to deploy your project. This includes “official” Docker repositories for many tools, such as ubuntu, postgres, nginx, wordpress, python, and much more.
- Using Docker helps you work with your IT / DevOps colleagues, since you can do your Data Science work in a container, and simply pass it over to DevOps as a black box that they can run without having to know everything about your model.
Here are a few examples of applications relevant to data science where you might try out with Docker:
- Create an ultra-portable, custom development workflow: Build a personal development environment in a Dockerfile, so you can access your workflow immediately on any machine with Docker installed. Simply load up the image wherever you are, on whatever machine you’re on, and your entire work environment is there: everything you need to do your job, and how you want to do your job.
- Create development, testing, staging, and production environments: Rest assured that your code will run as you expect and become able to create staging environments identical to production so you know when you push to production, you’re going to be OK.
- Reproduce your Jupyter notebook on any machine: Create a container that runs everything you need for your Jupyter Notebook data analysis, so you can pass it along to other researchers / colleagues and know that it will run on their machine. As great as Jupyter Notebooks are for doing analysis, they tend to suffer from the “it works on my machine” issue, and Docker can solve this issue.
For more inspiration, check out Civis Analytics Michaelangelo D’Agostino describe the Docker containers they use (start at the 18:08 mark). This includes containers specialized for survey processing, R shiny apps and other dashboards, Bayesian time series modeling and poll aggregation, as well as general purpose R/Python packages that have all the common packages needed for staff.
Further Resources
If you’re serious about starting to use Docker, I highly recommend the Lynda Course Learning Docker by Arthur Ulfeldt as a starting point. It’s well-explained and concise (only about 3 hours of video in total). I created a set of Anki flashcards from this course you can access here. I also recommend the book Docker Deep Dive by Nigel Poulton. I also created Anki flashcards from this book that you can access here.
Here are a few other useful resources you might want to check out:
- Docker for Data Scientists, Strata 2016, Michaelangelo D’Agostino (YouTube Video)
- Data Science Workflows Using Containers, by Aly Sivji (YouTube Video)
- A 3 Hour Docker for Data Scientists Workshop (YouTube Video)
Creating PDF Reports with Python, Pdfkit, and Jinja2 Templates
Once in a while as a data scientist, you may need to create PDF reports of your analyses. This seems somewhat “old school” nowadays, but here are a couple situations why you might want to consider it:
- You need to make reports that are easily printable. People often want “hard copies” of particular reports they are running and don’t want to reproduce everything they did in an interactive dashboard.
- You need to match existing reporting formats: If you’re replacing a legacy reporting system, it’s often a good idea to try to match existing reporting methods as your first step. This means that if the legacy system used PDF reporting, then you should strongly consider creating this functionality in the replacement system. This is often important for getting buy-in from people comfortable with the old system.
I recently needed to do PDF reporting in a work assignment. The particular solution I came up with uses two main tools:
- Jinja2 templates to generate HTML files of the reports that I need.
- Pdfkit to convert these reports to PDF.
- You also need to install a tool called wkhtmltopdf for pdfkit to work.
We’ll install our required packages with the following commands:
pip install pdfkit
pip install Jinja2
Then follow instructions here to install wkhtmltopdf.
Primer on Jinja2 Templates
Jinja2 is a great tool to become familiar with, especially if you do web development in Python. In short, it lets you automatically generate text documents by programmatically filling in placeholder values that you assign to text file templates. It’s a very flexible tool, used widely in Python web applications to generate HTML for users. You can think of it like super high-powered string substitution.
We’ll be using Jinja2 to generate HTML files of our reports that we will convert into PDFs with other tools. Keep in mind that Jinja2 can come in handy for other reporting applications, like sending automated emails or creating reports in other text file formats.
There are two main components of working with Jinja2:
- Creating the text file Jinja2 templates that contain placeholder values. In these templates, you can use a variety of Jinja2 syntax features that allow you to adjust the look of the file and how it loads the placeholder data.
- Writing the python code that assigns the placeholder values to your Jinja2 templates and renders a new text string according to these values.
Let’s create a simple template just as an illustration. This template will simply be a text file that prints out the value of a name. All you have to do it create a text file (let’s call it name.txt). Then in this file, simply add one line:
Your name is: {{ name }}
Here, ‘name’ is the name of the python variable that we’ll pass into the template, which holds the string placeholder that we want to include in the template.
Now that we have our template created, we need to write the python code that fills in the placeholder values in the template with what you need. You do this with the render function. Say, we want to create a version of the template where the name is “Mark”. Then write the following code:
https://gist.github.com/marknagelberg/91766668fcb668c702c9080387d96538
Now, outputText holds a string of the template where {{ name }} is now equal to “Mark”. You can confirm this by writing the following on the command line:
![]()
The arguments to template.render() are the placeholder variables contained in the template along with what you want to assign them to:
template.render(placeholder_variable_in_template1=value_you_want_it_assigned1, placeholder_variable_in_template2=value_you_want_it_assigned2, ..., placeholder_variable_in_templateN=value_you_want_it_assignedN)
There is much much more you can to with Jinja2 templates. For example, we have only shown how to render a simple variable here but Jinja2 allows more complex expressions, such as for loops, if-else statements, and template inheritance. Another useful fact about Jinja2 templates is you can pass in arbitrary python objects like lists, dictionaries, or pandas data frames and you are able to use the objects directly in the template. Check out Jinja2 Template Designer Documentation for a full list of features. I also highly recommend the book Flask Web Development: Developing Web Applications with Python which includes an excellent guide on Jinja2 templates (which are the built-in template engine for the Flask web development framework).
Creating PDF Reports
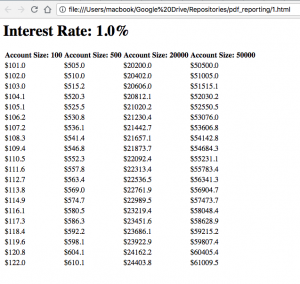
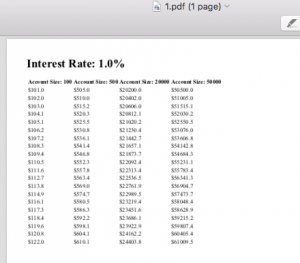
Let’s say you want to print PDFs of tables that show the growth of a bank account. Each table shows the growth rate year by year of $100, $500, $20,000, and $50,000 dollars. Each separate pdf report uses a different interest rate to calculate the growth rate. We’ll need 10 different reports, each of which prints tables with 1%, 2%, 3%, …, 10% interest rates, respectively.
Lets first define the Pandas Dataframes that we need.
https://gist.github.com/marknagelberg/a302de8904f0a5f3e3f739be84723dd3
data_frames contains 10 dictionaries, each of which contain the data frame and the interest rate used to produce that data frame.
Next, we create the template file. We will generate one report for each of the 10 data frames above, and generate them by passing each data frame to the template along with the interest rate used.
https://gist.github.com/marknagelberg/9018e3a1bb9ad9d6da1b8b31468e5364
After creating this template, we then write the following code to produce 10 HTML files for our reports.
https://gist.github.com/marknagelberg/cb31ff6c2902e33bea22898c828bab80
Our HTML reports now look something like this:
As a final step, we need to convert these HTML files to PDFs. To do this, we use pdfkit. All you have to do is iterate through your HTML files and then use a single line of code from pdfkit to each file to convert it into a pdf.
https://gist.github.com/marknagelberg/a72f5d5ada749c64980139466619b312
All of this code combined will pop out the following HTML files with PDF versions:
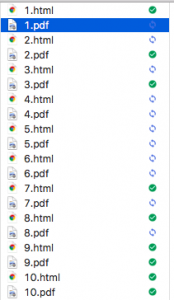
You can then click on 1.pdf to see that we’re getting the results we’re looking for.
We’ve given a very stripped down example of how you can create reports using python in an automated way. With more work, you can develop much more sophisticated reports limited only by what’s possible with HTML.